 ZERON-80
Rally Chronometer
- ZERON QUALITY AND RELIABILITY
- QUARTZ CRYSTAL ACCURACY
- COUNTS TO 59.99 MINUTES THEN ZEROS TO BEGIN NEXT HOUR
- REMOTE CHECKPOINT JACK
- HIGH BRIGHTNESS LED DISPLAYS
- RECALL OF TIME OF DAY WITHOUT LOSS OF SPLIT TIME
- STRAIGHTFORWARD, ERROR-PROOF OPERATION
- MAR RESISTANT BRUSHED ALUMINUM PANEL WITH LETTERING PERMANENTLY ETCHED INTO PANEL
(no paint to chip or stain)
- COMPLETE WITH ALL FUNCTIONS AND CABLES, NO "OPTIONS"
- SMALL RUGGED CONSTRUCTION IS IDEAL FOR ON THE ROAD COMPETITION OR CHECKPOINT TIMERS
CASE SIZE: Approximately 4" x 3" x 1.6"
POWER REQUIREMENTS: 10-15 volts DC at 0.3 amp average
OPERATION:
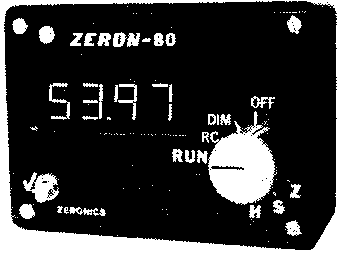
The rotary switch selects the different operating modes on the 80. Positions Z (Zero), S (Set), and H (Hold) are used for setting the 80 to time of day and will be explained later. When the knob is turned to any of the remaining positions, the 80 runs normally, i.e., it records time in 0.01 minute increments. This is true even for the unmarked positions. These bank locations will help prevent you from unintentionally switching into one of the time setting modes. Under normal use, leave the switch turned to RUN. This position is no different than the blank ones; it simply provides a fixed spot to leave the knob turned to. For night time use, the DIM position will decrease the display's brightness for easier viewing. To turn the display off, switch to OFF. Note that this does not turn the 80 completely off, but only removes power from the display. The 80 does not have a power off switch and will continue to operate as long as it is plugged into the car's electrical system. However, with the display off, the 80 draws a current of only 0.03 amp. Prolonged operation in this mode would not come close to draining the battery in a car that had been parked for several weeks.
The time split is activated by throwing the switch to the lower left to "checkpoint". This will hold the time displayed while the 80 continues to count internally. When the control is switched off, the display returns to time of day. The split function can also be controlled externally and the installation instructions cover the procedure. A special feature on the Zeron 80 allows you to return to time of day without losing the split time. By turning the rotary switch to RC (Recall), time of day will again be displayed. Returning to RUN or DIM brings back the original split time. If there's a discrepancy with the checkpoint workers' timing, you can verify your clock's accuracy without losing the split. Likewise, when using the 80 as a checkpoint timer, you can retain an arrival time and still have the time of day available should it be needed.
To set the 80 to time of day, use Z to zero the display then turn to S to run the time to slightly ahead of actual time of day. (The S mode advances time at 30.00 minutes per actual minute.) Turning now to H will stop the display so that you can wait for the time shown to arrive. You'll probably find it easier to switch to the blank position next to H and let the 80 count to an even minute or half minute. Then switch back to H and wait for time of day to catch up. When your time reference so indicates, switch out of H. The first time count in the 80 will occur exactly 0.01 minute later. When using WWV or CHU as your time source you might try holding the time at 0.10 minute after an even minute. You can switch out of H on the sixth beep (sixth second). The seconds come at regular intervals and are easier to anticipate than the first beep after the verbal announcement.
INSTALLATION:
Two pre-wired cables are included with the 80. The power cable is wired with a female jack and connects with the male plug at the back of the case. Wire the lead with the white runner to +12 volts (uninterrupted by the ignition switch) and the other lead to ground. Attach the leads securely. A momentary power loss, either 12 volts or ground, will erase the data in the display. Using a loose fitting cigarette lighter plug will almost guarantee problems! When wired correctly, the positive contact of the cable is recessed in the body of the jack and shouldn't cause any problems when the cable is tucked back under the dash when not in use. Should the leads be accidentally reversed during installation, the 80 will not turn on and no harm will be done. Care should be taken to not mistakenly wire the checkpoint split cable into the car's electrical system. This will damage the split circuit and cause the 80 to become unusable until repaired.
The checkpoint cable is wired with a male plug to engage with the female jack on the back of the case. If you want the remote function, wire the 2 leads to a toggle switch of your choosing. The 80 will split when the contacts are closed.
The 80 may be removed from its case by removing the 4 screws in the corners of the front panel. Pull the panel forward and then route the power and split leads through the cut out on the back of the case. The rubber grommet securing the leads should be pushed sideways into the cutout. Small holes may be drilled in the case for mounting but be sure that your hardware doesn't come in contact with any internal parts.
The 80 is built from components which operate at temperatures between 32 degrees F and 160 degrees F. Operation outside this range may cause incorrect time keeping. Always allow for adequate airflow around the case ventilation holes and the small heatsink that protrudes from the back of the case. (The heatsink is at ground potential so it won't harm anything if it touches part of the car.) On hot days when the car is closed and in direct sunlight, temperatures on the dash may easily exceed the upper limit. Watch out for this at breaks and rest stops. Turn off the displays if you must leave the car in a poor location.
ACCURACY:
When operated at ambient temperatures of 50 degrees F to 90 degrees F, the 80 will stay within 0.01 minute over a 12 hour period. The quartz crystal's frequency has been adjusted with the display turned on and the case warmed up to its usual operating temperature. This will result in even better accuracy than that given above. If the 80 is left on during a cool night with the display turned off, it may lose a hundredth or two by the next morning.
Manuals Index
RRN Index